I’ve got a little bit of everything to discuss in today’s update so I’ll break things up by subject matter to make it easy to see what you’re going to be reading about. Let’s not waste any further time and get into it!
MESBG – As the title suggests, I am working on my first true MESBG diorama after thinking of ideas for years and wanting to try my hand at one for a long time. I think now is the right time because my skills are at a place where I feel like I can use most painting techniques with confidence and I’m painting at a high level after several years of learning and practice. Making a diorama (or two!) for MESBG makes perfect sense as well because Lord of the Rings is one of the few things I never tire of and for as long as humanity and civilization exist, it will be a classic and well-regarded. While I haven’t missed painting MESBG for gaming purposes much, I do miss painting it in general and I think this is a great way to scratch that itch. Additionally, I’ve always had a chip on my shoulder at the somewhat icy reception that my work has received in the MESBG social media sphere but I’ll talk about that more when I get further along with this dio.

So who was I painting first for this diorama? Alfrid, the bloke above on the right. The trick is, he basically wears all black and has nearly black hair. So how can you paint him to make him look interesting? Games Workshop gave him a blue outfit which I felt was too bright and not in line with the character so I stuck with a dark brown with dull colors to capture his look from the movies. As you can see below, he is something to be proud of!
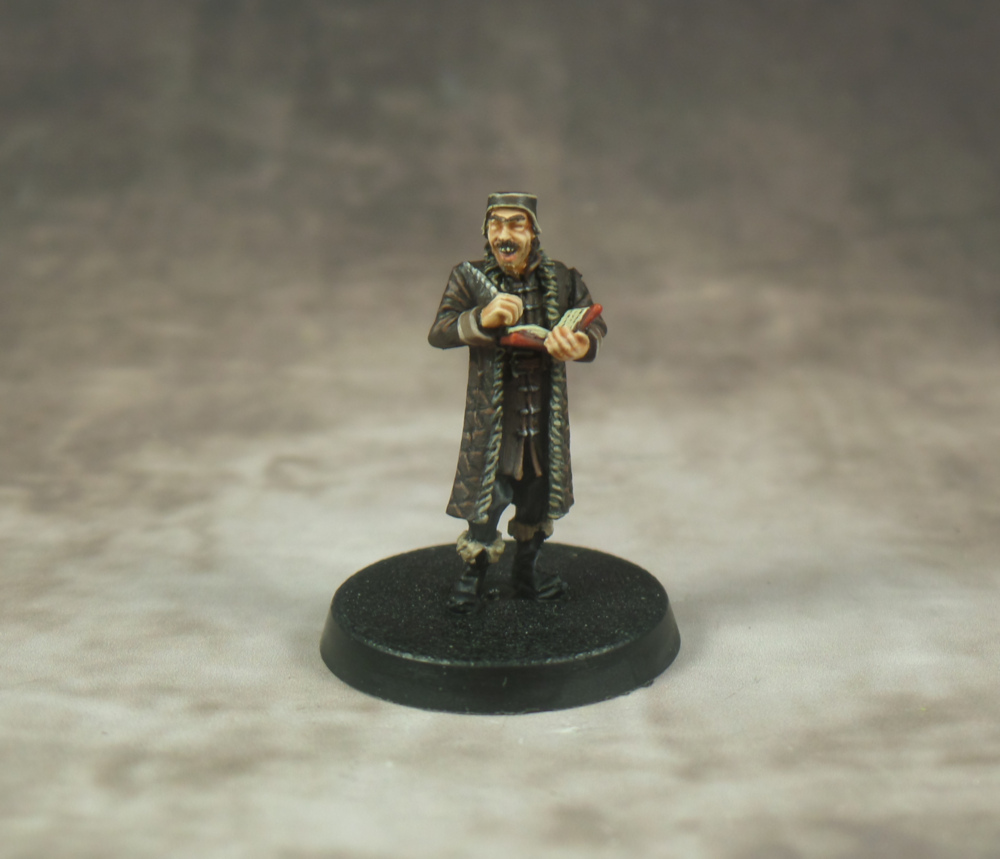
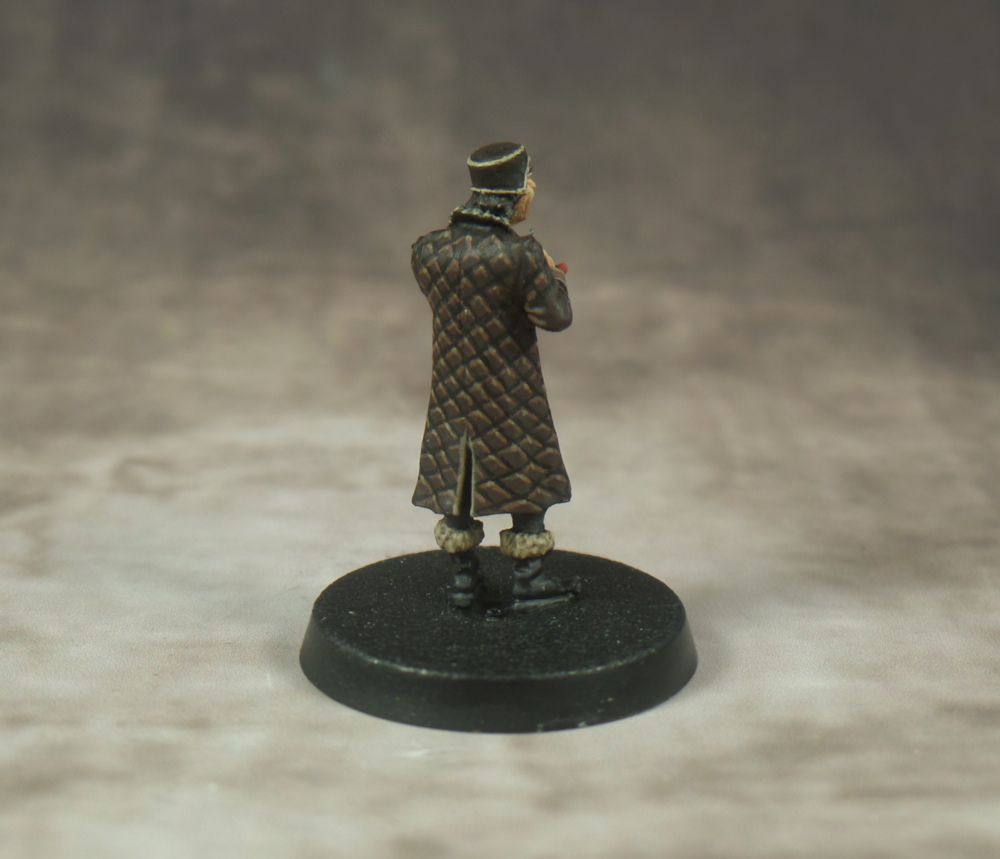
I’m very excited to share him with you because this is by far the best and ambitious freehand I’ve done. While I got the idea from another really talented painter who used a bluish color scheme, I think the colors I chose channel the spirit of the movie and make him about as good as he can in miniature form. Truthfully, he is only 90% done and I need to glaze in the shadows in the recesses of his clothes and touch up a couple of things but after working on him all week, I’m happy with how he is looking.
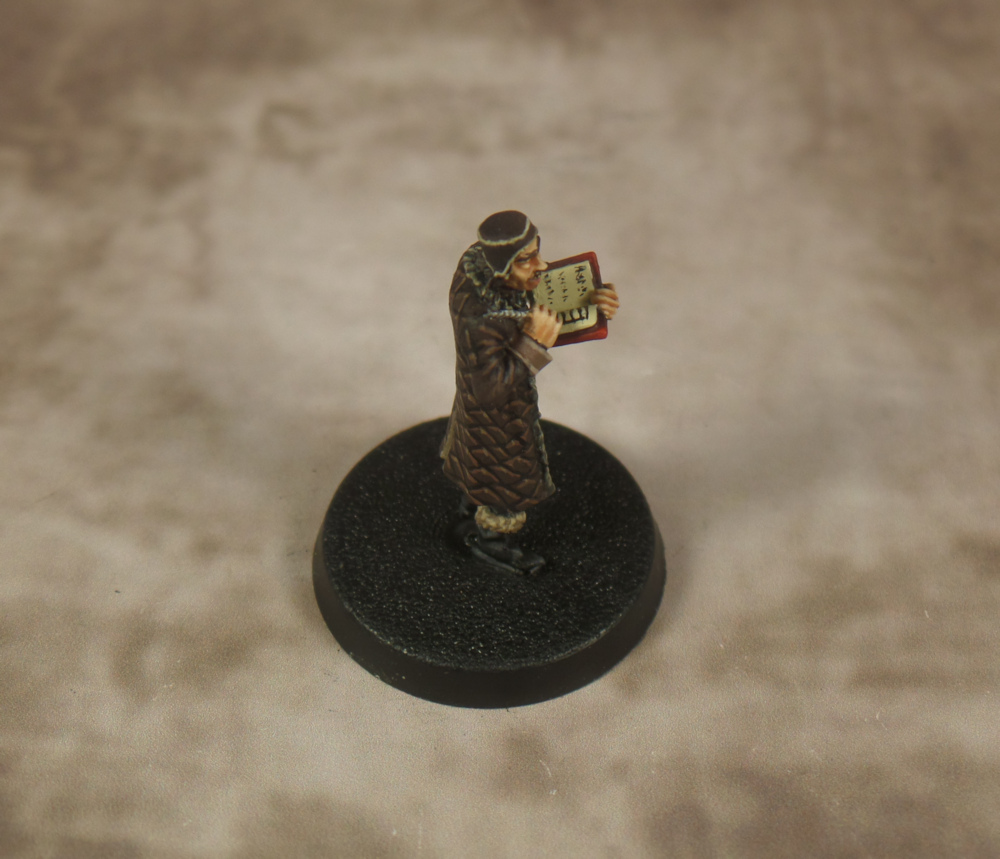
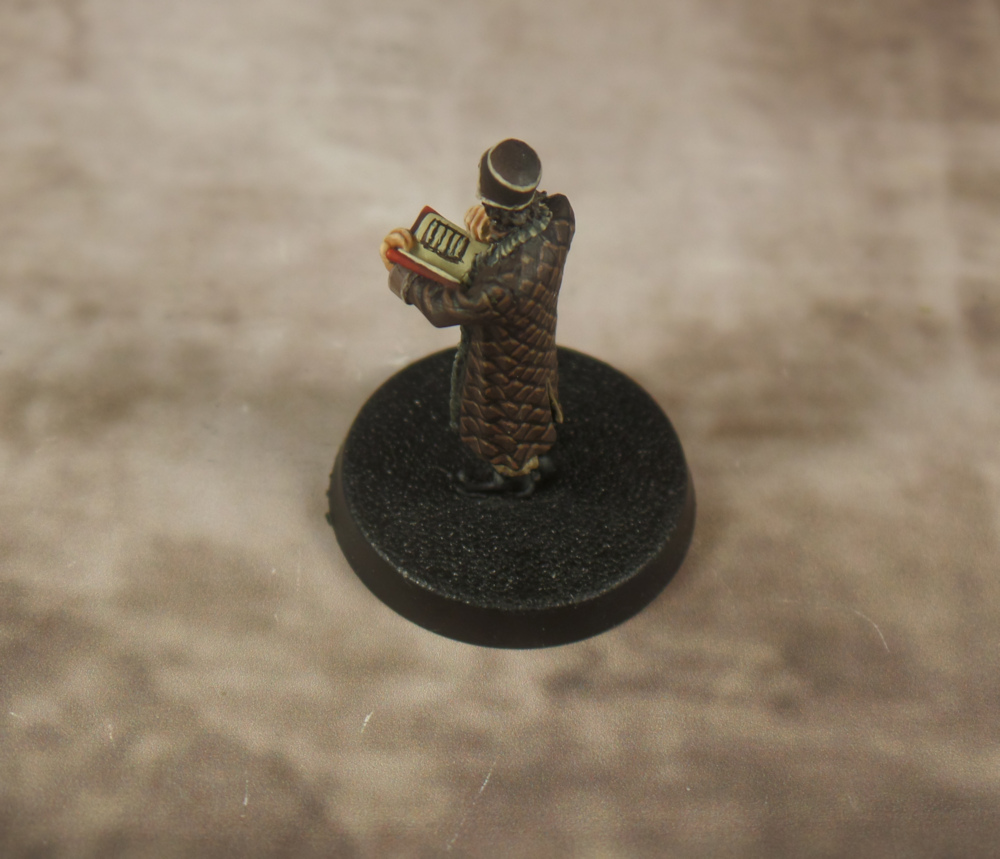
While the pictures are a bit darker than what I would like, I wanted to show some other little details I added in. Since I painted the pages in the book towards the end, it was really difficult and annoying to try and get the brush in there and paint anything without messing anything up. I barely managed and while I don’t love the ledger on the right page as much as I had hoped, I think it looks good overall and will be a nice little detail in the diorama which is what you want. A diorama should be feast for the eyes and so that is what I will shoot for.
Finally, here’s a look at something that gave me some consternation and probably could be better but I’m going to roll with it anyway. I wanted to find a base that was rectangular for the diorama I’m working on which was pretty tough. I ended up with this one from Model Display Products (a great supplier in the UK) that is really tall. Quite possibly too tall for the miniatures that will go on top. We’ll see how it ends up looking when I get further along. It will certainly a grand and as prominent of a stage as you can find!
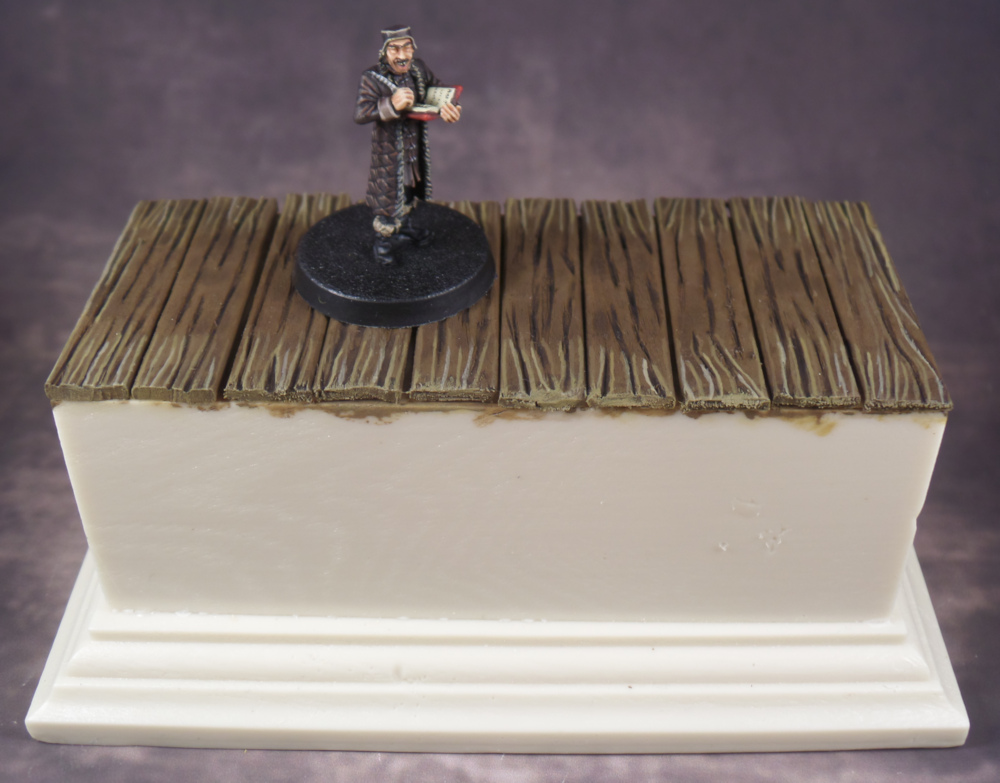
I am proud of the wood planks which were done from scratch with popsicle sticks (as we call them in the US). They were a pain to cut up and I think I actually bought ones that are too big for this scale but they’re going to be mostly covered up (hence the half-finished looking paint job) in the nearish future so I’m not sweating that too much.
So that is where the diorama stands now. I have 4-5 more things to paint so it will take a while before this is done. One thing I like about this project is that I can paint up one thing needed for the diorama and then stop and work on something else if I want. I think that will make it a fun project to work on and I can chip away at it when the mood strikes. I want to give a shout out to friend of the site, Bret. I actually attempted to paint the Master of Laketown first and I totally botched it. He was kind of enough to send me a spare that he has. I couldn’t have painted Alfrid as well as I did without messing up the Master so I certainly appreciate his help in all this. The alternative would have meant buying the $35 from GW again and then I’d have an extra Alfrid that I’d have no use for so he really did me a solid!
Fallout – As if that wasn’t enough, I’ve been working on some MDF terrain for Fallout to fill out my “board” a bit better. This is my first MDF terrain so I’m kind of making it up as I go along truthfully. I’m working on a construction trailer which I thought would fit nicely in the Fallout universe since there are industrial and manufacturing sites that have little trailers somewhat similar to this.
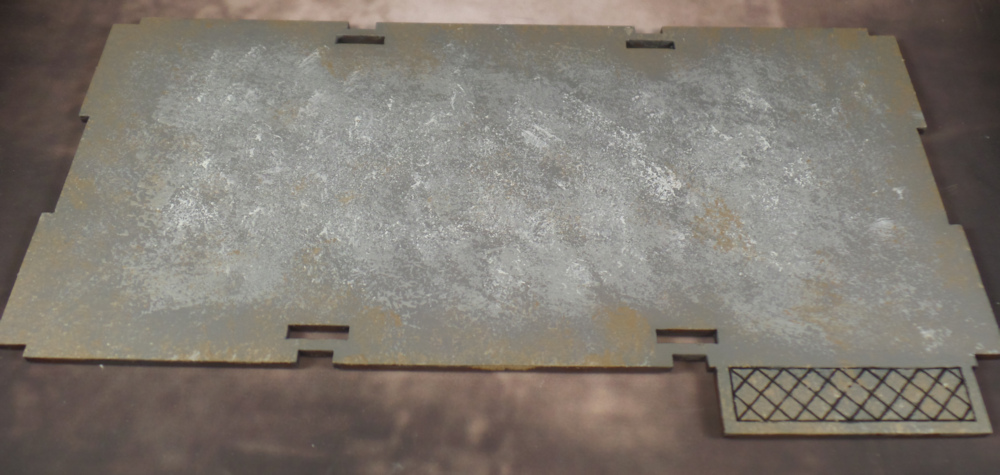
What you’re looking at above is the floor piece which is pretty much done. I’m working on basecoating the walls now and then I think I’ll give it a similar texture as the floor but with a zenithal type of highlight. It seems to me that the trick with MDF terrain is to give it texture so you don’t feel like you’re just looking at a flat piece of wood. I think the stippling on the floor and the dirt spots certainly do that. Thus far, this has been a nice thing to chip away at when I’m not doing crazy details on the diorama. It is a nice mix of challenging painting on the dio and mindless work on the terrain.
The only concern I have now is how to glue this together successfully. It seems to me like if you’re not careful, you could have crooked walls really easily which is definitely something I don’t want. I was going to use wood glue but I know that takes a while to set so I’m not quite sure, outside of using some books to keep things in place, how you can ensure everything stays in place as it dries. If any of you have experience with this, I’d love to hear any gluing/assembly tips you might have.
The other big thing that happened with Fallout is Modiphius announced that Fallout New Vegas will be getting miniature releases next year. Before playing Fallout 4, New Vegas was my favorite game in the series so I’m excited by this news though I will be plenty busy doing Fallout 4 minis and terrain for a while I imagine.
On the flip side, Bethesda, the company who develops the Fallout games was shockingly bought by Microsoft. This is a bummer to me as I have never owned an Xbox system (I’m a Sony and Nintendo fan) and I hope that Microsoft won’t make it so you have to buy an Xbox to play Fallout in the near future. It COULD mean that Modiphius (the makers of Fallout Wasteland Warfare) may have trouble with the Fallout license since they’re potentially dealing with a new company. I don’t think that will be the case since the game is popular and a money-maker but it goes to show you how fast things can change. Even if that did happen, it wouldn’t dampen my interest in Fallout Wasteland Warfare because I’ve got tons of painting and gaming to do before I’d come close to exhausting what has already been released. Regardless, it will be interesting to see what happens there and I look forward to learning more about the Fallout New Vegas minis that are coming our way as well.

Looking forward to watching this come ahead mate. I have to agree, I am a bit unsure as to what will happen with Bethesda as I too have a PS4.
LikeLiked by 2 people
Glad to hear it and it sounds like you’re in the same position as me with Fallout. I have a gaming PC so I can play it there if it becomes Xbox and PC exclusive but that would make it so a lot of people can’t play the series which would be a real bummer.
LikeLiked by 1 person
Glad to help with the Master, looking forward to seeing how you paint him. You can always use the other Master and make a statue of him. That is an excellent job on Alfred’s coat, I had to go look at GW’s site to see what the original looked like, what an improvement!
Believe it or not, what I use to keep things square while drying is legos! The different sizes can be used to fit the thickness of what you’re using and can build it up as high as you need.
LikeLiked by 3 people
Thanks for the kind words on the painting 🙂 I actually chucked the Master in your package so you’re going to receive a poorly done, semi-painted version of him. I don’t know why I did that, it just seemed more fair if you got a copy in return. When you see him, you’ll wonder how I ever painted Alfrid very well 😀
Using Legos is a very clever idea. I would have never thought of it and I actually have a couple of Lego sets here in the apartment so I’ll have to give that a try. Thanks for suggesting it!
LikeLike
Just showed my wife what you had done on Alfrid’s coat, her response: “Wow, how did he do that?” 😁
LikeLiked by 3 people
Haha! She’s more impressed than my fiancee. At most, she’ll say something that I slaved away on looks “good” or “nice”. Its a real tough crowd around here 😀
LikeLike
We wife says to tell you that she is a seamstress and that she appreciates fabric – so again, well done on the coat!
LikeLiked by 1 person
Ahh… That makes sense! Well then I appreciate her kind words even more! I don’t know how much she’ll like the Master’s gaudy and ill-fitting clothing but I will try to shoot for a high standard on it too 🙂
LikeLike
Excellent work on Alfred. I’m not familiar with the figure but it certainly looks like you have done a great job and the coat is excellent. Some bits like the book are tricky to get brush access and wherever possible I get those bits done first to save messing others bits up later. But I guess you have worked that out too now! Not that I get that right every time myself!
I use the same wooden sticks in my models. For scale I simply slice them in half long ways. Using a wire brush helps to add grain, allows paint to soak in and provides texture for dry brushing.
I buy oak wooden bases on Ebay for some of my dioramas so this link might be of interest as an example- https://www.ebay.co.uk/itm/182346249361
I love and dislike MDF kits. I like the precision and fit but not the finish, it always seems so flat and I am not good enough to paint depth on flat surfaces. As much as possible I add texture and use chinchilla dust. It worked well on some WW2 buildings I did some while ago. If the buildings are four sided then I pull them together using elastic bands until the glue sets and they are fine.
LikeLiked by 2 people
If I were smarter, I would have probably painted Alfrid in sub-assemblies but I’ve never been able to fully figure that out. I think display painters take an arm or a head and basically pin it on something and then they paint just that piece and then assemble it all later. If I had done that with the arm that held his book, I probably could have gotten better freehand than I did but oh well. I can live with the results I have gotten 🙂
A wire brush sounds really handy. Cutting all of the wood grain lines by hand was the most time consuming part and if there is a faster and less labor intensive way to do it, then I am all for it. I will have to remember that 🙂
Thanks for sharing that eBay link! They sell those kinds of things in a craft store that is pretty ubiquitous here in the states and I picked one up recently and have had my eyes opened up to these kinds of bases. I assumed most people used resin ones like the one I bought and now I know better! The wooden ones are much more economic and look nice. I will definitely be getting more in the near future 🙂
I have heard that rubber/elastic bands are the way to go and I think I understand why but I wasn’t entirely sure. I completely understand what you’re saying about textures. It is my chief concern as I paint it and we’ll see how it turns out. I wouldn’t be surprised if I have more to learn when it comes to MDF kits! 🙂
LikeLiked by 1 person
Really cool, I feel like the Hobbit era miniatures and scenarios generally don’t get as much attention from both GW and the fans so it’s nice to see a diorama in that style (at least that’s what I assume based on this post).
Great work on Alfrid, he looks very screen accurate and I love the little details in his book!
LikeLiked by 2 people
I completely agree and I wonder if it has something to do with how the movies turned out. Well that and the high cost of the Hobbit minis and Finecast but if you can get past those two things, most of those sculpts are higher quality than a lot of the LOTR-era ones so I think they deserve more credit too. Thanks for the kind words as well 😀
LikeLiked by 1 person
Alfrid’s coat looks awesome! I look forward to seeing more on this diorama.
LikeLiked by 2 people
Thanks, Dave! I’m excited to work on it some more myself so hopefully I can keep making steady progress and have more to show in the next couple of weeks 🙂
LikeLiked by 1 person
Well, Alfrid looks finished to me, Jeff! 🙂 Really nice! Colour scheme looks spot on to me!
Interesting that you write about “the somewhat icy reception that my work has received in the MESBG social media sphere” – knowing human nature, no doubt some people will be jealous of the standard you achieve and be unable to see that you are sharing your work with a community and not saying “look at me, aren’t I good”! They’re the one with the problems, not you but, giving some people the benefit of the doubt, 2020 has been a trying year for many people!
I’ve only built a couple of MDF buildings, but have found they usually go together very well – in fact, the fit of parts is usually good enough to keep them together without glue (although I wouldn’t recommend that for handling purposes). I think I just spotted some superglue on some of the joints with my buildings, although I did assemble them completely before considering painting.
LikeLiked by 2 people
Thanks, John! That is interesting about the social media topic and something I hadn’t considered at all. I appreciate you sharing those thoughts as it certainly could be a factor. I will delve into it a bit further soon for sure 🙂
Thanks as well for sharing your experience with MDF. I realized earlier today that I should really dry fit everything once I get it painted and varnished and then get a sense of how easy or not easy it seems like it will be to glue it. I’ve got quite a bit of menial painting to go to get to that point so I better buckle down and focus on that first 🙂
LikeLiked by 1 person
If I was you, I’d just concentrate on enjoying your hobby! I’m looking forward to seeing your MESBG diorama when it’s finished! 🙂
LikeLiked by 1 person
I will certainly try my best to do just that 🙂
LikeLiked by 1 person
Great job on Alfrid. I think I will take inspiration from your work when I get around to painting the Alfrid mini I have on my to do list…. although I intend to have it be Alfrid‘s replacement since our gaming is further along the timeline.
I wonder what is in the Fallout future following the disaster of Fallout 76…
LikeLiked by 2 people
I don’t know if you use GW paints, but I’m happy to share the paints I used on the coat if it would be helpful, just let me know 😀
Fallout 76 was the biggest misstep in the franchise for sure. In many ways, starting fresh and trying to put that behind them would be in their best interest. Bethesda as a company seem to be struggling a bit in terms of releasing high quality products in recent years so maybe that is a positive that will come from new ownership. I certainly hope so!
LikeLike
Wow, that is some bloody amazing freehand there! If the rest of the diorama matches that (and I’m sure it will) this will be incredible. Consider me watching this progress with interest 🙂
LikeLiked by 1 person
Thanks mate! I will certainly try my best to make this as high of quality as possible 🙂
LikeLiked by 1 person
Very nice job on Alfrid and great start to the diorama. I’m glad you’re doing one bc you’ve been talking about for awhile now. BUT I cannot for the life of me fathom why you would choose Alfrid as a subject? Of all the characters he is probably the most disliked. And it’s not like he’s an iconic character that people will recognize as being from LOTR. Maybe the rest of the diorama will reveal..😀
As for MDF kits, I have found that they usually go together pretty well. But it was pretty smart to do the painting while it’s still apart. I wished I had done that. My pattern with MDF kits is that I usually figure out how to do it perfectly after I’m about half way through it. 😀
LikeLiked by 1 person
To be fair, I’ve been talking about doing dioramas since I was in the hobby around 2016 so it was past time to actually make a full on diorama and not just a miniature on a display base 🙂 And haha, I knew someone would make this argument at some point on this diorama. “Cool diorama, but the Hobbit movies suck, mate!” is what I’m sure somebody will say when its done. I actually like Alfrid and the Master of Laketown. They were one of the few interpretations in the Hobbit that I thought worked well but I probably am in the minority in that regard 🙂 We’ll see how you feel as I get the diorama done. Maybe I can make an Alfrid fan of you yet! And if so, maybe I’ll work on a Jar-Jar Star Wars diorama next 😉
It sounds like I got the MDF half-right in that I’m painting it first and then gluing it but I just need to be a bit more patient and then I can probably glue it all in one go and be all set. Got a fair bit of painting to do in the meantime so I don’t need to worry about gluing anything for a while yet.
LikeLike
Nice blog
LikeLiked by 1 person
Thank you 🙂
LikeLike